Art Posting Tutorials
Two versions of Bang artworks must be submitted at the final deadline:
- the full size image (which should also be given to your writer to embed in their fic)
- cropped 1:1 ratio (minimum 540 x 540 px) square
- the square version cannot be NSFW/explicit.
ONE representative from each Team will submit these to us as hyperlinks. See the guide to Submissions for more information about the requirements. If you have never cropped an image, or retrieved a hyperlink for static image hosting, or embedded an image to AO3, here are the basics.
For The Dragon Age Big Bang, we require art to be hosted on an independent website of the artist’s choosing. AO3 does not host images – meaning, you cannot upload a raw image file from your computer to AO3. Instead, you need to embed an image to a work on AO3, which means you need a url that ends in an image file extension.
File extensions that AO3 allows:
- .jpg
- .jpeg
- .png
- .gif
Our goal is to obtain a url for the image that will never expire and allows public embedding and viewing, such as: https://images.squidge.org/images/2024/09/29/dabb-icon.png
Selecting a Suitable Image Hosting Site
Section titled “Selecting a Suitable Image Hosting Site”There are several websites that allow you to host images and create public embeds. Always check the Terms of Use to see if fanworks, and/or nsfw art, is allowed on their sites.
The Mods’ preferred site for their own personal embed uses is Squidge. The example to follow will use Squidge. However, the process of getting a static image url from most other image hosting sites is the same.
If you use one of the unsuitable websites below, we will contact you for a different link.
Retrieve a Direct Link to a Hosted Image
Section titled “Retrieve a Direct Link to a Hosted Image”Upload your image to the site.
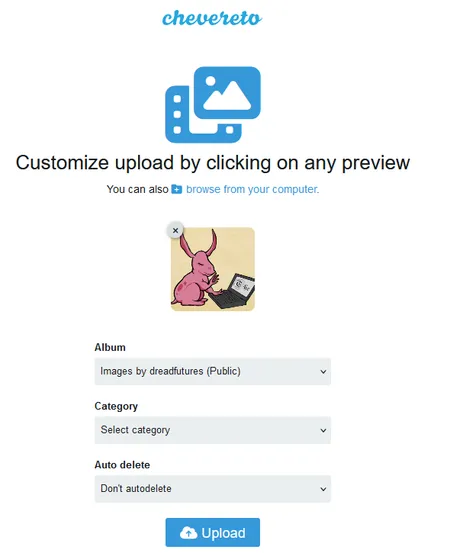
Section titled “Upload your image to the site.”You will usually be asked to add some data as you upload. This ranges from the file name to content tags for search indexing.
Below, Squidge asks for what album on dreadfutures’ account to add the image to, what category (Fandom vs. Personal) the image belongs to, and the Auto Delete setting (set to never).
View Uploaded Image
Section titled “View Uploaded Image”On Squidge, this is where you can change the title of the image, and other things. We are looking for direct links that end with a file extension. There are many links on this page that are not suitable.
See below:
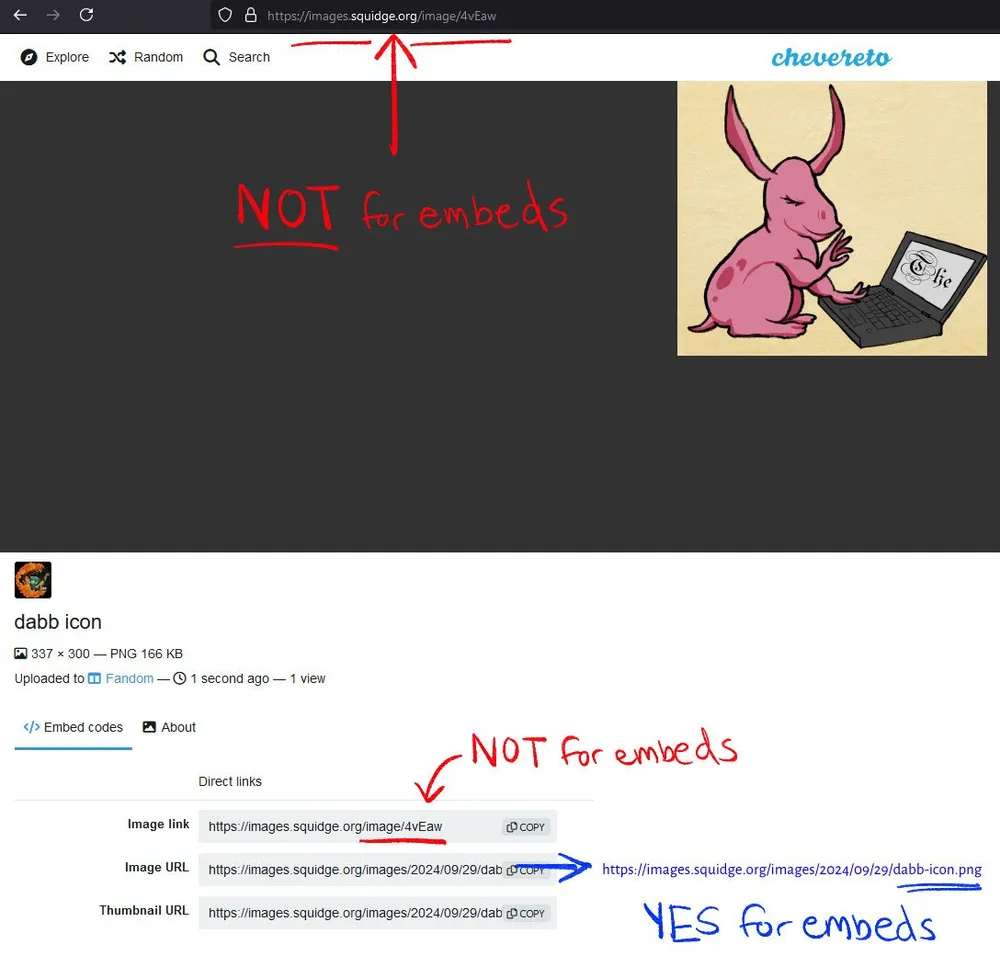
This url is what your writer will use for AO3 (and you too, if you want to submit to the collection independently).

With your embedded image in hand:
- Send this to your writer
- Use this in your own AO3 work if you make one
- Submit this link with your team’s final works.
How to Crop Art into a 1:1 Ratio (Square)
Section titled “How to Crop Art into a 1:1 Ratio (Square)”This event requires a perfect square crop of a portion of the Artwork(s) in order to make the Tumblr Promo Posts play nicely across all views. This also helps NSFW artworks avoid the automatic censors, by presenting a SFW preview above the readmore in the Tumblr post.
Almost every image manipulation/art software has a native “restricted crop” function that will make sure your crop is a perfect square. If your software is not listed here, search for a tutorial online about that feature.
In GIMP: If you would like to crop the image in a specific aspect ratio, such as a square, make sure the tool options are visible (Windows → Dockable Dialogs → Tool Options). In the Tool Options dock, check the mark next to Fixed Aspect Ratio. Type the desired aspect ratio in the text field below, such as “1:1”. You also have buttons to change the aspect from landscape to portrait. After you set the aspect ratio, drag one of the corners of the crop rectangle to update it. The rectangle changes to the chosen ratio, and when you drag it should maintain that ratio.
In CSP: Use the rectangle selection tool. Hold shift as you click and drag the rectangle selection tool, and it should form a perfect square. Once you have a selection, this button is the Crop button:

In Procreate: In the Crop & Resize feature, you can lock the aspect ratio using the Settings and making sure the “chain link” between the W and H is on:

In Krita: To get started, choose the Crop tool and then click once to select the entire canvas. Using this method you ensure that you don’t inadvertently grab outside of the visible canvas as part of the crop. You can then use the options below to refine your crop. At its most basic, the crop tool allows you to size a rectangle around an area and reduce your image or layer to only that content which is contained within that area. The numbers are the right are from top to bottom: width, height, and aspect ratio. Set the aspect ratio to be the same on both sides, then click the checkbox to keep the aspect ratio locked to allow you to manipulate the other two without losing the position or ratio of the locked property.
In Photoshop: Use the crop tool, lock a 1:1 aspect ratio with the “chain link” button, and select your area. Alternately, hold shift as you click and drag.
How to Embed Art in a Fic on AO3
Section titled “How to Embed Art in a Fic on AO3”The tutorial below is taken directly from AO3’s FAQ on posting images to AO3. There are more resources available at that link.
Now that your image is hosted and you have its direct URL, you can embed it into your work in one of the following ways:
Rich Text Editor
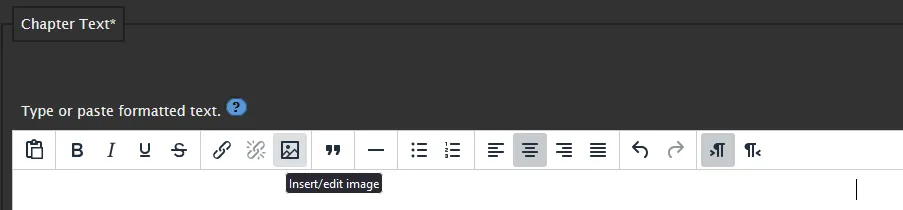
Section titled “Rich Text Editor”- In the Work Text field, ensure the “Rich Text” button is selected.
- Select the “Insert/edit image” icon from the toolbar, which will open a dialog box.
- In the “Source” field, enter the full image URL you copied earlier.
- You can enter an image description which will inform users what the image contains if they’re using assistive technology or have images turned off in their browser.
- If you wish, you can also edit the image dimensions, which are auto-filled when you enter the image URL. If the “Constrain proportions” lock is active, the image height and width will be kept proportional. This allows the image size to be changed without distorting it. If you don’t want this to happen, select the lock so it changes to an unlocked icon.
HTML using embed code
Section titled “HTML using embed code”Image hosting websites often provide you with embed code which you can use to post your image. To use this code in your work:
-
In the Work Text field, ensure the “HTML” button is selected.
-
Find the “Share” or “Embed” link and copy the code into the Work Text field. Hosting sites typically include some extra code in this option, such as a link back to their site.
HTML using raw code
Section titled “HTML using raw code”- In the Work Text field, ensure the “HTML” button is selected.
- Enter the following code, replacing
IMAGE_URLwith the image URL you copied earlier, and replacingIMAGE_DESCRIPTIONwith a short description of the image:<img src="IMAGE_URL" alt="IMAGE_DESCRIPTION" />The image description is optional, but will inform users what the image contains if they’re using assistive technology or have images turned off in their browser.
Resizing your image with HTML
Section titled “Resizing your image with HTML”Images are automatically resized to ensure the full image fits within the width of the user’s screen. This means that whether they’re on a mobile device, tablet, or computer, the image will never be too big to fit their display. In order to do this without distorting the image, the height attribute is ignored. If you’d like to adjust the size of an image, you need to use the width attribute.
To make the image appear smaller, for example, you could use <img src="IMAGE_URL" alt="IMAGE_DESCRIPTION" width="50%" />. We recommend using screen percentages when resizing to ensure they will never load larger than a user’s display, but that’s up to you and depends on what you’re trying to achieve.
Previewing and Posting your work
Section titled “Previewing and Posting your work”It’s a good idea to preview your work to make sure your images appear correctly to other users. To confirm how your work displays for other users, first log out of your image hosting site, then select the “Preview” button in the Post section of the page (below the work). You can then select the “Post” button if you’re happy with it, or “Edit” if you’d like to make changes.
For more information about using HTML in your work, go to Formatting content on AO3 with HTML.